Salesforce Security Best Practices -Vishing Warning
Posted: August 14, 2025 Filed under: Uncategorized | Tags: admin, Appexchange, In-App Guidance, Salesforce, Security, technology Leave a commentIf your IT department calls you asking you to do something you probably would do it without giving it a second thought. That’s why the new wave of cyber criminals are now calling you directly and impersonating your companies IT support staff.
Unlike past phishing emails, that often get blocked by IT’s email security rules, criminals are now using voice calls (aka Vishing) and are extremely convincing. They will act like they are calling from your IT support team. They might send you to websites for you to steal your credentials and MFA tokens or ask you to install an app that seems legitimate.
Recently, cyber criminals have been gaining access to Salesforce orgs around the world by convincing admins to install a “new” version of Data Loader app. The app of course is not legit and once it is installed the criminals have access to your Salesforce data.

Don’t Get Conned
Be suspicious if you get an unexpected call from your IT support (or anyone else for that matter–whether your child or the President) asking you to do something. With even just a small bit of audio, criminals can imitate a voice so that call could truly sound exactly like your boss.
If you are a Salesforce Admin you can help spread the word to your users about these types of Cons. You can easily do this using the out-of-the-box no-code In-App Guidance. Just create a prompt to warn users about Vishing and remind users to only log into the designated url. Include an acknowledgment button that the user has to click to close the prompt. Then add your prompt to “Any Page, Any App” and schedule it to show up every day until they acknowledge the message.
Sidenote: If you are new to In-App Guidance it is absolutely cool tool for educating users in the context of Salesforce; watch a video here https://salesforce.vidyard.com/watch/EeyJabzZtNm67Fz6NzTFYM and take this trailhead https://trailhead.salesforce.com/content/learn/modules/user-engagement/promote-feature-adoption-and-discovery to learn more.
Proactive Ways to Protect Your Salesforce Org
While you cannot prevent your teammates and users from falling victims to this or other cons, Admins can take steps now to minimize the damage should a bad actor try to get into your Salesforce org. Here are some things you can do:
- Ensure everyone is using MFA. No exceptions. Salesforce requires this but you will need to enforce it for your users and third parties.
- Limit login IP ranges to your trusted enterprise and VPN network addresses. Define them at the profile level for added control.
- Follow the Principle of Least Privilege. This is an issue I see ALL THE TIME. Entire objects are made public and shared with everyone instead of only giving users what they need to do their job. Connected apps have too many permissions and access to more data than it needs. Far too many users have admin level permissions. Bottom line only give people and systems access to the data and capabilities that they need to do their job. Nothing more.
- Run the Health Check. Use the out of the box Salesforce Health Check found under Setup to see if there are any recommended security settings that need improvement.
- Use Tools to Monitor for Threats. I know Salesforce shield and other threat detection tools are not cheap but ask yourself if you can afford NOT to have it. The cost of an undetected breach could be several millions of dollars and cause severe reputation damage.
- Use the AppExchange – Only install apps directly from the Appexchange as they have all been vetted by Salesforce security. You might have legitimate third-parties that ask you to install their non-Appexchange package but do so with extreme caution and verify the authenticity of the app first.
- Use Data Masking. The above best practices all apply to your sandboxes as well, but with Sandboxes you have an additional tool in your toolbelt–Data Mask. Salesforce has an add-on product that you can buy that will automatically obfuscate personally identifiable information (PII) and sales revenue to random or similar words. If your IT budget does not allow for this one could also DIY it through an ETL process to remove sensitive information before loading data in to sandboxes.
I often joke ‘This is why we can’t have nice things.’, but the good news is that with Salesforce we can STILL have a powerful app that adds efficiency while also securing and protecting access to data.
Stay vigilant everyone.
###
My Salesforce Exam Experience with Pearson OnVUE
Posted: August 1, 2025 Filed under: Uncategorized | Tags: Certification, education, Exam, OnVue, Salesforce, Trailblazer, Trailhead, WebAssessor Leave a commentWith over 20 Salesforce certifications under my belt, I have a lot of experience with the Salesforce exam experience with WebAssesor. My first exam was in 2013 and over the years I’ve seen a lot of enhancements and changes to the exam experience but none quite as extreme as the July 21st 2025 migration from WebAssesor to Pearson OnVUE.
I took a Salesforce Certification exam from OnVUE the very first week it went live and I am sharing my experience on this new platform to help you prepare.
PREREQUISITES
Now everyone will be required to have a Trailblazer account in order to register for an exam. This is easy to do but you will want to keep the following in mind:
Government Name: When you actually check in you will be expected to show a valid government issued identification that matches the name on your Trailblazer account. Fortunately I go by my given name but if you use a nickname or a different last name you will need to get your Trailblazer account updated first.
Valid Email: To get the confirmation and reminder emails make sure you have a valid email address tied to your Trailblazer account and not one for a previous employer that you cannot access. I did not have one on mine so I had to remember the exam date and log into Trailhead to start the exam.
If you are taking the exam online you will need to have a computer on Windows 10, MacOS 13 or higher. Tablets and phones are not permitted. In addition you need a webcam, micophone and speaker and adequate network speeds.
SALESFORCE EXAM REGISTRATION
The actual experience of signing up for an appointment was relatively straightforward. From Trailhead you first enter your preferred language; the choices currently are English and Japanese. Then the timezone listed in your Trailhead profile will appear, but you can select a different one, and you click on your preferred date.
The system will suggest a recommended appointment start time. At first I thought that was the only open time but then I realized there was a button called “Explore more times”. Click that to see all of the available slots for that day.

⚠️An important difference to note is that your appointment time is for when the Exam is scheduled to start but the expectation is that you start the check-in time thirty minute before that time.
CHECK IN AND VERIFICATION
I thought I would be extra prepared and downloaded and ran the OnVue software and Systems Test the night before. You do that by going to https://www.pearsonvue.com/us/en/salesforce/onvue.html and clicking on Run system Test. I felt better knowing it worked but ultimately it did not save me any time on test day as I was required to do it again.

When you arrive thirty minutes early for check-in you will be asked to install and Run the System check which basically locks down your computer for only the test. So make sure you have install permissions on your computer. For this reason work computers usually will not work.
You will be given a QR code to scan on your mobile phone where you will take photos of the front and back of your government issued identification. You will also take photos of your desk from multiple angles–including front and back.
Then you are told to put your mobile phone aside and you will be put in a queue to be checked in by a proctor. This is the worst part. You literally just have to set there staring at a camera view of yourself. Fortunately it does show where you are in the queue. I was 7th in the queue so it took a while before it was finally my turn.
When the proctor came on they had me hold up my laptop so the camera would show every possible part of my desk. They told me to remove my tissue box, then they told me to remove my pen container, then they told me to remove my bobblehead, and on and on it went. The instructions said to “Remove all other items from your desk and at arms’ reach”. I felt the items were well out of arms reach but apparently they were still too close. Lastly, I had to hold up my laptop camera to show that my non-used monitors were unplugged.
I truly do appreciate this thoroughness though, as I work very hard to learn and study for my exams. I applaud any effort to stop people from cheating.
Test Day Recommendations
- It was awkward trying to hold up the laptop to point the camera to show my test area. Next time I will use an external webcam
- Next time I will just take the test at the kitchen table instead of having to literally take everything off my work desk and unplug all my monitors.
- Remind others in your household that you are taking an exam and ask them to be quiet and avoid streaming to ensure you have adequate bandwidth.
THE SALESFORCE EXAM EXPERIENCE
It took the full thirty minutes before I was finally given the greenlight from the Proctor to take the exam. As with WebAssesor, there are some instructions and agreements before the exam appears. When you are ready you can start the actual test.
Once I started the exam the first question appeared right away and I could see the timer countdown in the upper right corner of my screen.
I thought I read that I could zoom in to make the font larger but I could not immediately figure out how to do that and gave up as the font was a decent size already. I had my reading glasses on my head in case I needed them but never did.
💖💖My absolute favorite new feature is the ability to strike out options that I knew were incorrect. It was a bit finicky at times to strikethrough but if you click on the text of the answer it will show the line like this. That really reduced my overall test time as I did not waste time rereading all the options.
As with WebAssessor you could flag records that you wanted to review later. It was quite easy to click the flag button to mark items.
You then have the option to go back and review the items that were flagged. Another nice new functionality is that the start of the question is displayed. So instead of just showing that I had question 2 and 3 flagged, it would show the first 100 or so characters from the question. Even though it is hard to really know the gist of a question from just the first few characters I found this added to my confidence and allowed me to quickly find a question that I wanted to go back to.
Here is an illustrative example of how the Salesforce Review section looks:
| Number | Question | Flagged |
| 1 | Acme corporation wants to… | |
| 2 | What is the best way to… | 🏴 |
| 3 | How would a developer… | 🏴 |
Unfortunately this new tool did not show a count of the number of records that I had flagged the way WebAssessor did. I had to manually try and count them in order to gauge my confidence in passing the exam. For example, if I had 10% flagged then I knew I would be good but if I had 15% flagged then I would want to review them some more.
SALESFORCE EXAM RESULTS
Once you submit the exam you will immediately see if you passed along with your percentage right for each major area.
I am happy to report that I passed the exam.
For me it is stressful taking an exam because the questions are so complex and one accidental glance to the side or unconscious mumbling to yourself can cause the proctor to step in. So after about 15 minutes of decompressing I logged into Trailhead to see if my new certification showed up. The shiny, new certification badge was already there.
Best of luck to you on your certification journey.
######
Hands on Salesforce Training
Posted: July 13, 2023 Filed under: Uncategorized | Tags: Dreamforce, Salesforce Leave a commentPractically all of us have goals that our managers expect us to achieve so that we continue to grow as an employee and as a person. As we are approaching fourth quarter what have you done to achieve YOUR goals?
For me, I find attending Salesforce community events helps me expand my skillsets and open my mind to new ideas. There are two primary types of community events in the Salesforce ecosystem. Local and Regional.
The local events take place in dozens of cities around the globe. These events are organized by local volunteers, like me, who know that we can succeed more together than apart. There you can meet with other Salesforce professionals from your area, attend training on new features, see demos of apps, share ideas, discover new approaches and bounce thoughts off of other Salesforce professionals.
Dreamin’ Events
The regional events are often known as “Dreamin'” events. As the name implies many attendees at these regional events can only dream of going to Dreamforce in San Francisco. Time and budget simply does not allow for it. So in an effort to help those that can not make it Dreamforce the Dream’ events were born.
The first “Dreamin” event was Midwest Dreamin’. I was part of the original committee that organized it in 2014. I remember the excitement and fear after we signed that contract for what felt like an exuberant amount of money to reserve Navy Pier in Chicago. We knew we had to make this event a success in order to pay for the space. Little did I need to worry as there was a huge demand for an event like this. Dreamforce was simply not accessible for most people.
Since then the concept of “Dreamin'” events have spread like wildflowers. Today you will find several multi-day “Dreamin” conferences around the world. They all have amazing speakers featuring-real-world advice. They all have amazing sponsors from the appexchange and partner community who help keep costs affordable for attendees. And because these events are often around 300-500 people you can make personal connections with the speakers and other attendees.
What‘ Are You Waiting For?
If you have not been to a “Dreamin” event in your region what’s your excuse?
I would be shocked if you know everything about Salesforce, I have been in the ecosystem since 2006, hold over a dozen certifications and have been a Salesforce MVP since 2013. I live and breathe Salesforce and there is still so much I need to learn. Maybe the challenge is money. Most companies have continuing education funds. Be sure to use yours. Perhaps, you have asked and your company just won’t pay for these events. Some companies are just scrooges like this. If your company will not invest in you, then you need to invest in yourself. The good news is there are cost-saving opportunities. If you register early you can save big on registration. And at many events you can volunteer for a discounted or free registration. Take advantage of the hotel conference rate or find a cheaper hotel a block or two away. If you have to travel in from out of town, you can often use the event boards to find a roommate to split the costs or go with a friend from your local user group.
I speak to many attendees at these events that are self-funding their way and taking PTO to attend. That’s how valuable these community events can be.
So I hope the real reason is that you were not aware of the Salesforce community. Now that you know it is up to you, and only you, to get to your local or regional events.
Here’s a link to the local community groups: https://trailblazercommunitygroups.com
Here’s a link to the “Dreamin” events. https://trailhead.salesforce.com/community/conferences
I can’t wait to see you at the next one!
Lessons From Legends of Low Code
Posted: March 25, 2022 Filed under: Uncategorized Leave a commentI recently participated in a multi-day competition as part of Salesforce’s inaugural Legends of Low Code. The Legends of Low Code was a contest where three strangers were teamed up and given a challenge to build a solution in Salesforce using only declarative tools.
So IS it possible for a newly formed team to quickly deliver results? Well you’ll have to watch the show when it airs in April on Salesforce+ to find out; but here are some observations I had on teamwork from competing in this event.
Communication is key. This means that you have to listen to your teammates. Obviously there will be times when each team member is working on their assigned tasks so plan to have regular touch bases. These touch bases are your opportunity to share and discuss ideas, issues and progress towards goals. If possible, use shared tools for collaboration such as Slack, Teams, Google Docs or Quip instead of everyone having their own notes or working off different versions of the same document.
Respect each other. Sure you are under a lot of pressure but that is no excuse for forgetting your please and thank yous. Show support and encourage your teammates. Studies actually show that respect at work increases productivity, A big part of respect is trusting your teammates–remember they are professionals too.
Lastly, as with any sports team, a true team means everyone is pitching in and contributing. So quickly discover everyone’s strengths and interests to determine how everyone can best use their time. While doing so find ways to get to know your teammates and try to build a bond. Remember you are a team– and succeed or fail as a team–so provide support if someone gets stuck.
Hopefully some of these tips will come in handy for you at work. After all, most people frequently need to collaborate with new people in other departments on projects. Salesforce is a powerful tool but if the team developing it is struggling then it won’t be as successful as it could be.
Migrating Standard Picklists and Field Dependencies
Posted: January 15, 2022 Filed under: Salesforce Tips and Tricks | Tags: Deployment, sandbox, Workbench Leave a commentMost Salesforce admins find themselves using Change Set for moving items from Sandbox to Production. Change Sets are the workhorse of Salesforce, reliable and they get the job done most of the time. But sometimes you need a more precise too. For example when you want to move field dependencies for standard picklist fields like Case Reason or Case Type.
The solution to this dilemma is XML packages. Before you say I’m an Admin and stop reading – hear me out.
XML stands for Extensible Markup Language and unlike many coding languages it is designed to be readable by humans. To be honest though, it is more like reading Homer than J.K. Rowling–not always the easiest to comprehend but it is still readable.
The good news is you don’t have to know much XML and I will walk you through all the steps to deploy dependent picklist values.
Let’s say we have a custom field called “Reason Detail” that is dependent field on the standard field Case “Reason”. In the Salesforce UI it will look like this:

When we look at this same table in XML it looks like this:

If you look at the highlighted section you can easily see that the “Reason Detail” value “Product Defect” will only show under the case reason of Breakdown, Equipment Design, Installation and Performance. Pretty simple, right?
So to migrate this field dependency from one sandbox to another we just need to retrieve the XML and then deploy the XML to the new org.
I’ve summarized the steps to do this below–all you need is system admin permissions–but you can also find a step by step guide to retrieving and deploying using Workbench on this Salesforce help article: https://help.salesforce.com/s/articleView?id=000315117&type=1
Step 1: Prepare the XML file
The first step is to prepare the xml file with the list of metadata you want to pull from your sandbox. In our example we are only including the two field names we want to retrieve.
- Open Notepad or similar txt application
- Start by copying and pasting the below code snippet. In this example we are going to ask Salesforce to retrieve or return an XML of the metadata for the Case “Reason” picklists (they call this StandardValueSet) and the custom field details for “Reason Details” and how it relates to Case “Reason”.
- Feel free to swap out the custom field Reason_Details__c with the api name of your custom field.
- Give the file an name and save it as an .xml.
- I called mine “Retrieve.xml” (Very important –it must end in .xml)
<?xml version="1.0" encoding="UTF-8"?>
<Package xmlns="http://soap.sforce.com/2006/04/metadata">
   <types>
     <members>CaseReason</members>
     <name>StandardValueSet</name>
   </types>

   <types>
     <members>Case.Reason</members>
          <members>Case.Reason_Details__c</members>
     <name>CustomField</name>
   </types>
        <version>53.0</version>
</Package>
Step 2: Get the fields and dependent picklists from your sandbox.
Now that we have the retrieve XML file prepared, the next step is to use Workbench to get the metadata for these fields from the sandbox.
- Go to https://workbench.developerforce.com/login.php
- Select “Sandbox” environment
- Note: The API number listed is usually the most current so typically okay to leave as is unless your Production org is a release behind your Sandbox org. For example if Sandbox is on Summer ’23 and your Production org is still on Spring ’23. In that case lower it one number.
- Log in to workbench using your Sandbox credentials
- Go to “Migration” tab
- Select “Retrieve” option
- In the Unmanaged Manifest section click the “Browse” button and select the package XML file you created in step 1
- Click “Next” button
- Click “Retrieve” button
- Click “Download Zip File” and save the file
- Take note of where you saved it as you will use this zip file in Step 3
- Pro tip: Open the file with Notepad to review the file to ensure you pulled the correct information.
Step 3: Deploy the fields and dependent picklist to Production
The last step is to push the metadata you retrieved from the Sandbox into the new target org.
- Go to https://workbench.developerforce.com/login.php
- Select “Production” environment
- Log in to workbench using your Production credentials
- Go to “Migration” tab
- Select “Deploy” option
- Click the “Choose File” option and select the zipped file you retrieved in Step 2.
- I recommend checking the following fields
- Rollback on Error
- Single Package
- Confirm all of the options for deployment.
- Click on the Deploy button when you are ready.
- Wait for the process to be completed. It usually doesn’t take too long.
- Confirm the results deploy successfully, if not check the file for any errors.
That’s it! Now you can log into the target org and view the updates you just made. You should now see the picklist values and field dependencies match the sandbox org.
CRM is so 2010—Say Hello to CXM
Posted: April 30, 2021 Filed under: SFDC Admin 101 | Tags: Connections, Digital Marketing, Events, Marketing, Marketing Cloud Leave a commentCXM? Thanks to the X Games, most people think of X as Extreme when in reality the X in CXM stands for Experience. But in many ways CXM is taking CRM to the extreme.
Here are 5 key ways CXM differs from CRM:
- CRM is internal focused with the goal of process improvements and cost efficiencies. CXM is focused on the customer and their needs. The best organizations ask their customers what they want.
- CRM is talking. CXM is listening. With CRM, organizations measured the number of ad impressions a person had but with CXM great marketers want to measure what the consumer is saying.
- CRM is often transactional based. CXM focuses on the customer over their entire life cycle. The best marketers know that customer retention is key to long-term success.
- CRM is linear communication. CXM is social. The old way of sending out one-way marketing messages is dead. Today customer’s want to interact with organizations in all channels.
- CRM is consistent. CXM is dynamic—each customer gets a different experience; one tailored just for them . CXM is proactive and anticipates customers’ needs.
Bottom line, CXM is a complete mind-shift for most organizations that requires them to rethink the fundamental way they interact with their customers. Those that successfully make the transition will be their market leaders.
Ready to learn more about dynamic marketing from leading visionaries? Register now for Salesforce Connections on June 2, 2021 at 9 am PT.
https://www.salesforce.com/connections/

Get with the Flow Action
Posted: April 26, 2021 Filed under: Uncategorized | Tags: Actions, Flow, Lightning Leave a commentI have been an advocate of Object-Specific Quick Actions for years. In fact, I have given dozens of formal presentations on Quick Actions to hundreds of people at several Dreamforce conferences, World Tours and community events. There’s a reason I love them, with Object Specific Quick Actions an admin can use config-only to let users create or update records and send email with just two clicks without leaving the page they’re on. They are extremely easy to set up and the time-savings for users can be massive.
As much as I love the power and simplicity of the Object Specific Actions I am now all in on championing Flow Actions. I still love Object-Specific Actions but I am obsessed with Flow Actions. Why? Because Actions with flows can truly take your user experience to the next level.
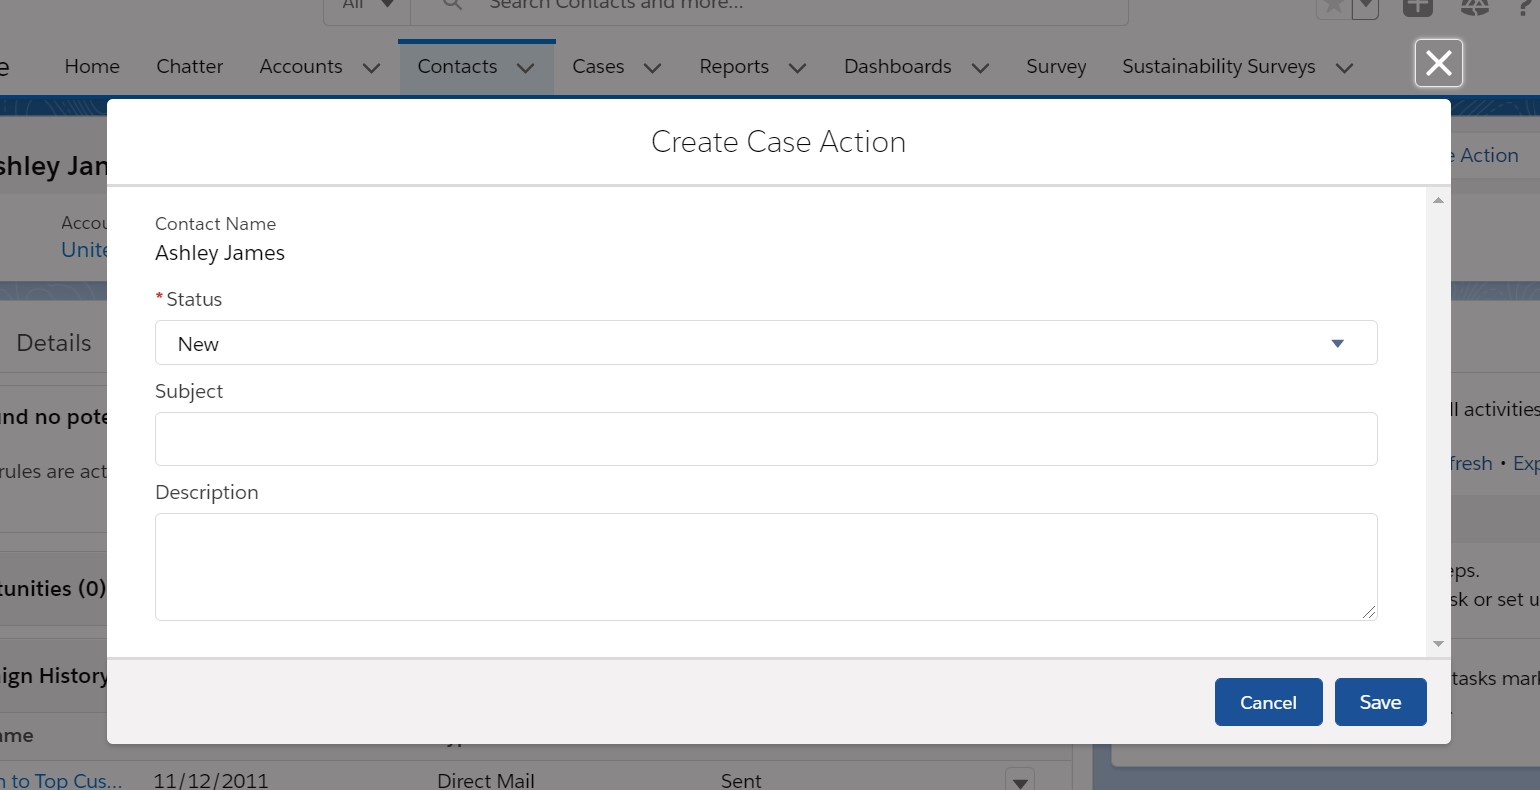
Here is an example of a Create Case Object-Specific Action. It is clean and simple asking me for a few fields and even has the Status prepopulated. Nice!
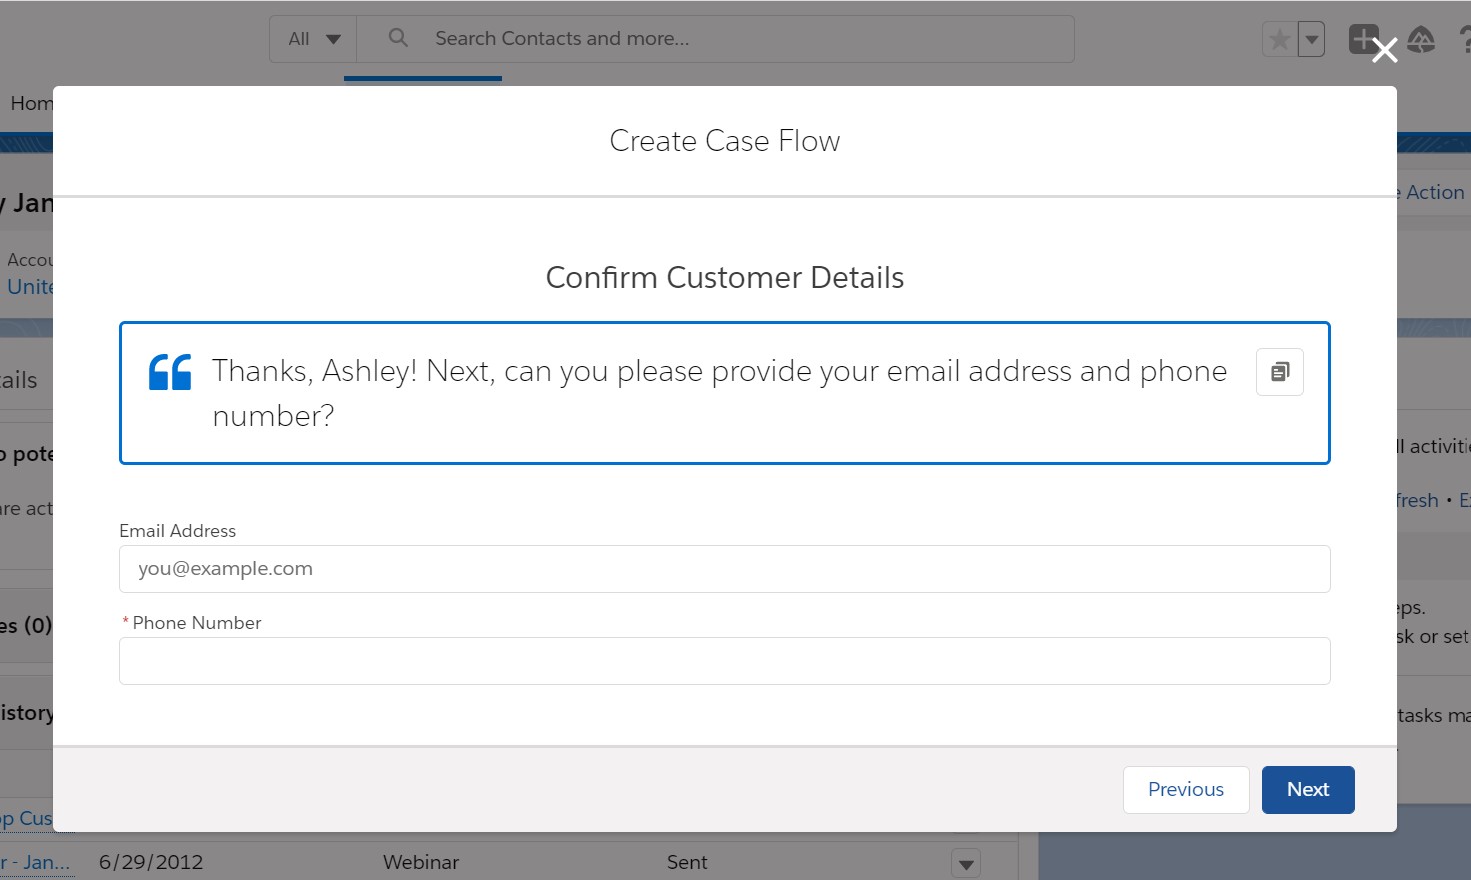
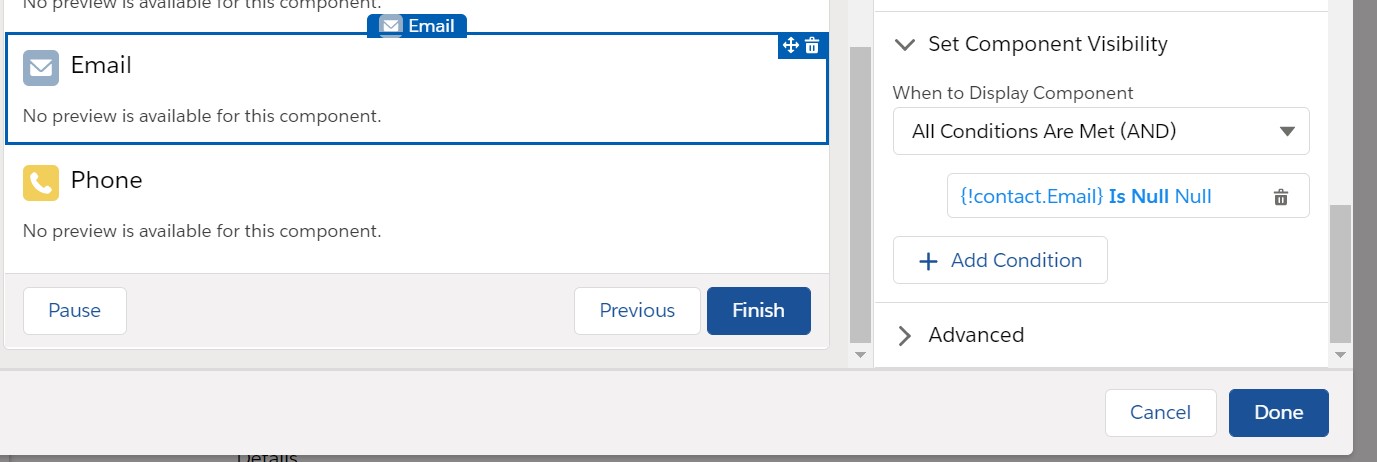
And here is an example of a Create Case Flow Action. What a difference! As the end user I am walked through the process of creating a case when I click the “Next” button at the bottom instead of seeing all the fields at once. I can even see my call script, customized for my contact Ashley by name. The email address even has a sample format so I know what it is expecting. Very nice!
By creating a basic Screen Flow you can use many simple to implement flow features that will make it beneficial to switch from Object-Specific Actions to Flow Actions. Here are three of my favorite tools:
- Display Text: Add this component to your screen flow to provide directions and guidance on-screen to users with simple WYSIWYG rich-text editor.
- Placeholder Text: Instruct users what to put in individual fields without the risk that users will leave it unchanged the way they might with Predefined Values. It’s especially great for explaining acceptable field formats.
- Component Visibility: Steam-line the user experience by conditionally hiding and displaying fields. No more taking up valuable real-estate for fields that are not always needed or creating a different action for each record type.
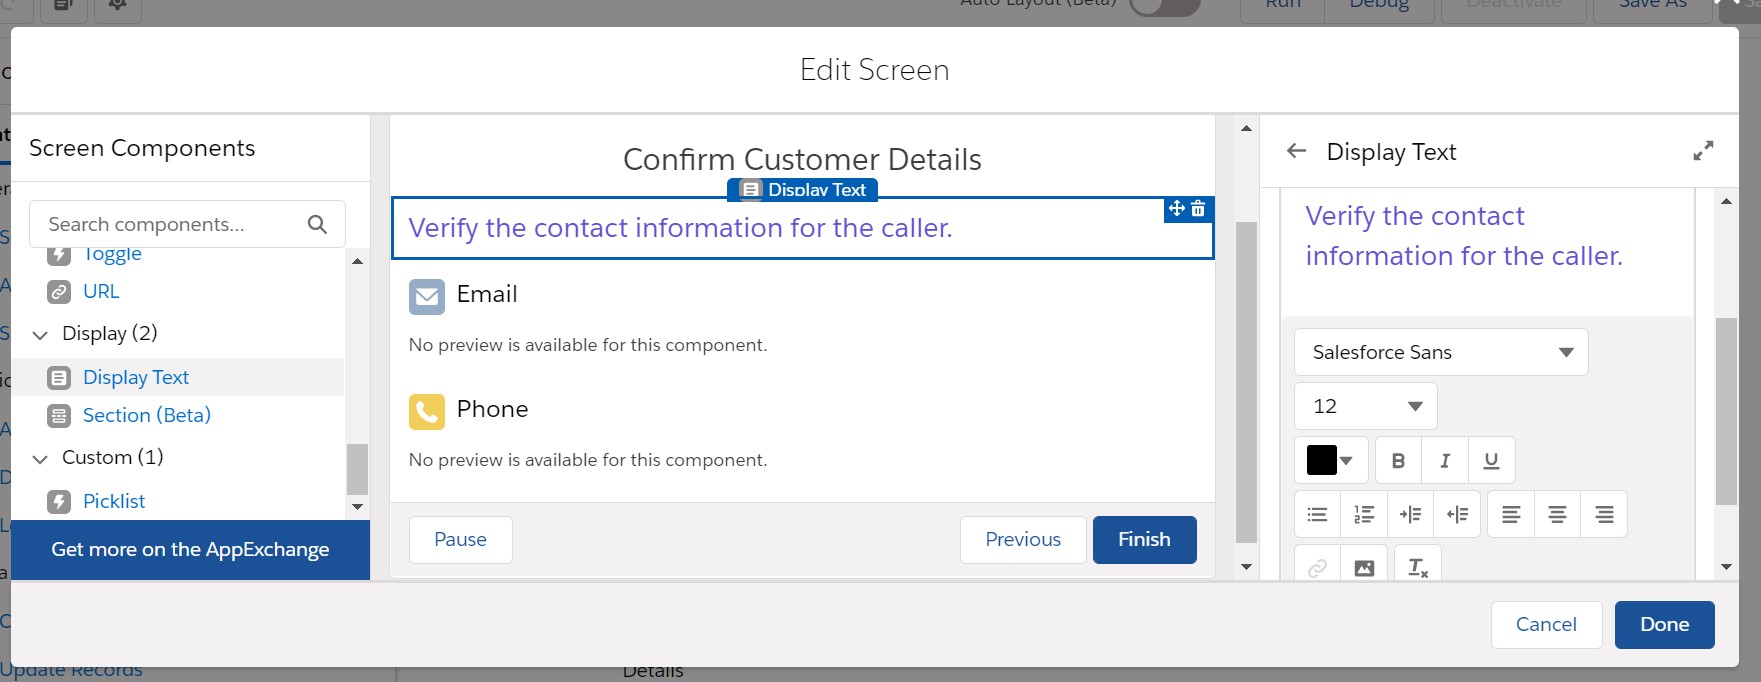
Let me show you how easy it is to do these items inside of a Flow. Here is an example of how to add Display Text to a screen flow. Note how you can specify the font, color, size and even add bullets, numbers and lists:
To add Placeholder text simply type in the text you want to display in the “Placeholder Text” settings.

In this example of Component Visibility on a screen flow I am only displaying the email field on the screen if the Contact’s email is blank on their user record. You can even make it visible based on values entered by the user on an earlier screen.
Just like object-specific actions you can easily use Flow to make fields read-only, required and prepopulate them with data.
And that’s just scratching the surface! Flows can do hundreds of things that Object-Based Quick Actions cannot do. So next time you are thinking of creating a quick action take some time and build it in Flow. Your users will flip for flow.
Flow is a powerful tool and it can be overwhelming at first so to get started I recommend you check out this trailhead to get started.
Winter 21 Features for Admin Superpowers
Posted: September 1, 2020 Filed under: Uncategorized Leave a commentWinter releases from Salesforce are always the ones I anticipate the most and with Covid-19 we all need something to look forward to more than ever. Winter releases are typically chock-full of cool new functionality and features and this one is no exception. It’s impossible to cover them all so here are a few of my favorite new Lightning features that will give you Admin Superpowers and will save every Salesforce Admin time and stress.
Dynamic Actions to Hide or Show Buttons
Now you can control the visibility of buttons on page layouts. This new functionality allows button-click admins to use both record and user filters to determine if a page should show or hide buttons on a page. How life-changing is that?!
Just think of the use cases; You can show the Approval button on Opportunity if the Amount is over a certain amount. Or show a Reopen button only on a closed Case. You can even display buttons based on a permission assigned to the user looking at the record. So if you want to allow only specific users to see a button you can now do it.
In the works as well is a beta mobile version you can try out on custom objects. This would allow you to make mobile only buttons and hide buttons that are better suited for desktops.
Before you either had to tell users to ignore the buttons that did not apply, resort to making new page layouts just to show different buttons, or really complicate things by creating visualforce pages.
This new features is GA for Custom objects and Beta for Standard Objects. Check out all the details on Dynamic Actions here.
In-App Guidance On Edit and New Screens
I have spoken at Dreamforce several times about custom In-App Guidance so I have been watching it mature and grow over the years. Like a proud mother I am so excited about what it is capable of now compared to when it first came out.
In-App Guidance let’s button-click admins (and delegated trainers) add on-screen tips and directions for end-users. As an admin you decide what pop-up tips you want to appear based on the page and the user. It’s like being able to time-travel and sit next to your users and guide them through new features.
With Winter 21 I love that you can now add prompts on the New, Edit and Clone pages. This will allow you to create pop-up tips for the users as they are editing records. This can dramatically help improve onboarding and reduce user errors and confusion.
Also new this release is the ability to share a link to a specific prompt to allow for easier testing and training. There are a few other enhancements to In-App Guidance as well in Winter 21. If you have not tried In-App Guidance yet now is the time. You owe it to your users.

Optimizer App and Page Performance Analyzer
I’ve been preaching the importance of running the Salesforce Optimizer report for years but truth-be-told I always struggled to remember to run it at the same time monthly. Now with Winter 21 you can actually schedule your Optimizer to run monthly.
What’s the Optimizer app you say? Well, it is an Admin’s secret weapon to stay within limits and maintain best practices. Just go to Setup and run the “Optimzer” then find your results in your App Selector and you will see an analysis of your org, areas for improvement and how-to resources. For example you can see unused reports and just click the link to check the report out to decide whether to keep it. You’ll see all kinds of metrics and new ones are being added with each release–including 7 new ones in Winter 21.
You can learn more about the Optimizer app in Trailhead
Also new in Winter ’21 is the ability to analyze your Lightning page performance. To view the assessment of your page’s performance, click Analyze from the Lightning App Builder toolbar. You’ll be presented with suggestions to improve your page performance.
With the Optimizer and Analyzer it will be like having Admin X-Ray vision into your Org.
Get Ready for Winter 21
These are just a few of the new Lightning features you can find in Winter 21 that will give you Admin Superpowers. Be sure to check out these and all the other items in the Winter 21 release notes so that you are prepared when the release hits Sandbox about September 11 and Production instances on October 9th and 16th.
The Summer 19 Forecast Looks Hot
Posted: March 18, 2019 Filed under: Lightning, Uncategorized | Tags: admin, Lightning, roadmap, summer Leave a commentWinter has been especially cold, harsh and long in the Central US where I live. The meteorologists can’t seem to provide forecasts that I like so I decided instead to focus on the Summer forecast of Salesforce new features.
I took at look at the Salesforce Lightning roadmap that Salesforce provides and reduced the pages and pages of features down to just the features planned for Summer 2019.
While there are several Reports and Knowledge enhancements on the Summer 19 Roadmap. I think the hottest Summer 19 feature will be the Related List Preview showing up to 10 columns and the ability to Filter Related Lists. Just think how useful and efficient that will be to end users to see key information at a glance AND interact with it without having to drill-down to another page.
One of my favorite features of Summer 19 will definitely help automate and save your end-user time and mistakes, but sadly will probably be underutilized. I am referring to Macros with Conditional Steps. If you have not already I strongly encourage you to build Macros for your Salesforce end users. With macros, repetitive tasks–such as sending an email and updating a case status–can be reduced from multiple clicks to one. Macros work great today already and the addition of conditional steps will make it an even more powerful tool.
I can’t wait for these and the other hot new Summer 19 features to be released to Sandboxes about mid-May and in Production around mid-June. Hopefully summer will be here before we know it.
Here are all 18 features listed on the Lightning Roadmap as of March 2019:
- Dashboards: Scheduled refresh (without email)
- Reports: Historical trending in tabular format (create, edit)
- Reports: Joined reports
- Reports: Notifications
- Branding and Theming: Per Lightning app
- Related Lists: Show up to 10 columns on preview
- Related Lists: User filters on related lists
- Console Chrome extension
- Utility Bar: Right-align buttons
- Accounts: Account Partners related list
- Opportunities: Opportunity partners
- Lightning Knowledge: Detach related files
- Lightning Knowledge: Inline edit
- Lightning Knowledge: Knowledge Component Action — Insert URL to Case Publisher
- Lightning Knowledge: Knowledge Component available for all objects (search only)
- Lightning Knowledge: Mass actions (delete, submit for translation)
- Macros: Conditional steps
- Social Customer Service: Mass approvals and recall
Gain User Insight with List Views
Posted: December 8, 2014 Filed under: Salesforce Tips and Tricks, SFDC Admin 101, User Management | Tags: custom fields, Inactive Users Leave a commentIf you’re a Salesforce Admin chances are you have created tons of list views for Accounts, Contacts and other objects for your users to use. I recommend you take some time to create list views for YOU to use. You’ll find that they can help you quickly access information–saving you valuable time and frustration. In fact, there are several areas in the Setup area where you can add list views. You can create custom list views for Permission Sets, Profiles, Users, Public Groups and Domains just to name a few.
In this post, I’m continuing my series on User Management Tips from one of my Dreamforce 14 presentations. I’m sharing ideas on how you can use Salesforce List Views on the User object to make you a more efficient admin.
User List Views
In list views, you can filter on almost every User attribute found on the user record such as Storage Used, Status, Roles, Profiles, Managers, even Last Login. Here are some common list views that I recommend you set up:
- Active Users
- Inactive Users
- Admin Users
- Frozen Users
- Users in each division or department.
- Users by license type (ie Marketing Users, Content Users)

In addition, to the above list views you may want to create list views that you can look at on a weekly or monthly basis to manage user adoption and data storage. Here are a few I recommend:
- Large Storage Users
- No Login This Week
- Password Expring Soon
In my last post I talked about adding custom fields to your User object. You can use those in your list view as well. Say for example, you created a custom field to track users for an add-on webinar product, you can create a list view of “Webinar Users”. This is very helpful when you need to report on users or send a mass communication out to the users of that product. Other common list views on custom fields include users by cost center or mobile device users.
Filter Out Inactive Users
One of the most common user management complaints that I hear is that you cannot delete a User from Salesforce. Instead you can only make them active or inactive. Not being able to delete a User is actually a good thing as it helps maintain any historical information about that user, including completed tasks and prior record ownership. But most of the time if a user is Inactive an Admin doesn’t want to see them in the list of users. That’s why for all of my User list views I filter out inactive users. All you have to do is set the “Active” field to equal “True”. Now, those inactive users never, ever show up on my views–they’re as good as dead to me.

Because I occasionally do need to see inactive users and you probably do as well, I do recommend creating one list view called “Inactive Users” where the “Active” field equals “False”.
List View Visibility
As with all list views, you can opt to have user list views visible only to you, to all users or share with certain groups of users. Most of these list views you’ll want to share only with other Admins.
It Slices and Dices
As you can probably tell, I love list views! I find them much faster than reports for managing my daily admin workload as I can jump from one view to another instantly. I can customize the columns on the fly if need be and quickly drill-down and view and edit the records I need to work on. I also like that I can click on column headers to quickly sort and filter by values. The one big gotcha though is you cannot do inline edit on the user list view. Be sure to vote for this idea as it will be a huge time-saver for editing multiple users at once. Even without this, user list views should be in your user management arsenal.
#SMT
