Migrating Standard Picklists and Field Dependencies
Posted: January 15, 2022 Filed under: Salesforce Tips and Tricks | Tags: Deployment, sandbox, Workbench Leave a commentMost Salesforce admins find themselves using Change Set for moving items from Sandbox to Production. Change Sets are the workhorse of Salesforce, reliable and they get the job done most of the time. But sometimes you need a more precise too. For example when you want to move field dependencies for standard picklist fields like Case Reason or Case Type.
The solution to this dilemma is XML packages. Before you say I’m an Admin and stop reading – hear me out.
XML stands for Extensible Markup Language and unlike many coding languages it is designed to be readable by humans. To be honest though, it is more like reading Homer than J.K. Rowling–not always the easiest to comprehend but it is still readable.
The good news is you don’t have to know much XML and I will walk you through all the steps to deploy dependent picklist values.
Let’s say we have a custom field called “Reason Detail” that is dependent field on the standard field Case “Reason”. In the Salesforce UI it will look like this:

When we look at this same table in XML it looks like this:

If you look at the highlighted section you can easily see that the “Reason Detail” value “Product Defect” will only show under the case reason of Breakdown, Equipment Design, Installation and Performance. Pretty simple, right?
So to migrate this field dependency from one sandbox to another we just need to retrieve the XML and then deploy the XML to the new org.
I’ve summarized the steps to do this below–all you need is system admin permissions–but you can also find a step by step guide to retrieving and deploying using Workbench on this Salesforce help article: https://help.salesforce.com/s/articleView?id=000315117&type=1
Step 1: Prepare the XML file
The first step is to prepare the xml file with the list of metadata you want to pull from your sandbox. In our example we are only including the two field names we want to retrieve.
- Open Notepad or similar txt application
- Start by copying and pasting the below code snippet. In this example we are going to ask Salesforce to retrieve or return an XML of the metadata for the Case “Reason” picklists (they call this StandardValueSet) and the custom field details for “Reason Details” and how it relates to Case “Reason”.
- Feel free to swap out the custom field Reason_Details__c with the api name of your custom field.
- Give the file an name and save it as an .xml.
- I called mine “Retrieve.xml” (Very important –it must end in .xml)
<?xml version="1.0" encoding="UTF-8"?>
<Package xmlns="http://soap.sforce.com/2006/04/metadata">
   <types>
     <members>CaseReason</members>
     <name>StandardValueSet</name>
   </types>

   <types>
     <members>Case.Reason</members>
          <members>Case.Reason_Details__c</members>
     <name>CustomField</name>
   </types>
        <version>53.0</version>
</Package>
Step 2: Get the fields and dependent picklists from your sandbox.
Now that we have the retrieve XML file prepared, the next step is to use Workbench to get the metadata for these fields from the sandbox.
- Go to https://workbench.developerforce.com/login.php
- Select “Sandbox” environment
- Note: The API number listed is usually the most current so typically okay to leave as is unless your Production org is a release behind your Sandbox org. For example if Sandbox is on Summer ’23 and your Production org is still on Spring ’23. In that case lower it one number.
- Log in to workbench using your Sandbox credentials
- Go to “Migration” tab
- Select “Retrieve” option
- In the Unmanaged Manifest section click the “Browse” button and select the package XML file you created in step 1
- Click “Next” button
- Click “Retrieve” button
- Click “Download Zip File” and save the file
- Take note of where you saved it as you will use this zip file in Step 3
- Pro tip: Open the file with Notepad to review the file to ensure you pulled the correct information.
Step 3: Deploy the fields and dependent picklist to Production
The last step is to push the metadata you retrieved from the Sandbox into the new target org.
- Go to https://workbench.developerforce.com/login.php
- Select “Production” environment
- Log in to workbench using your Production credentials
- Go to “Migration” tab
- Select “Deploy” option
- Click the “Choose File” option and select the zipped file you retrieved in Step 2.
- I recommend checking the following fields
- Rollback on Error
- Single Package
- Confirm all of the options for deployment.
- Click on the Deploy button when you are ready.
- Wait for the process to be completed. It usually doesn’t take too long.
- Confirm the results deploy successfully, if not check the file for any errors.
That’s it! Now you can log into the target org and view the updates you just made. You should now see the picklist values and field dependencies match the sandbox org.
Gain User Insight with List Views
Posted: December 8, 2014 Filed under: Salesforce Tips and Tricks, SFDC Admin 101, User Management | Tags: custom fields, Inactive Users Leave a commentIf you’re a Salesforce Admin chances are you have created tons of list views for Accounts, Contacts and other objects for your users to use. I recommend you take some time to create list views for YOU to use. You’ll find that they can help you quickly access information–saving you valuable time and frustration. In fact, there are several areas in the Setup area where you can add list views. You can create custom list views for Permission Sets, Profiles, Users, Public Groups and Domains just to name a few.
In this post, I’m continuing my series on User Management Tips from one of my Dreamforce 14 presentations. I’m sharing ideas on how you can use Salesforce List Views on the User object to make you a more efficient admin.
User List Views
In list views, you can filter on almost every User attribute found on the user record such as Storage Used, Status, Roles, Profiles, Managers, even Last Login. Here are some common list views that I recommend you set up:
- Active Users
- Inactive Users
- Admin Users
- Frozen Users
- Users in each division or department.
- Users by license type (ie Marketing Users, Content Users)

In addition, to the above list views you may want to create list views that you can look at on a weekly or monthly basis to manage user adoption and data storage. Here are a few I recommend:
- Large Storage Users
- No Login This Week
- Password Expring Soon
In my last post I talked about adding custom fields to your User object. You can use those in your list view as well. Say for example, you created a custom field to track users for an add-on webinar product, you can create a list view of “Webinar Users”. This is very helpful when you need to report on users or send a mass communication out to the users of that product. Other common list views on custom fields include users by cost center or mobile device users.
Filter Out Inactive Users
One of the most common user management complaints that I hear is that you cannot delete a User from Salesforce. Instead you can only make them active or inactive. Not being able to delete a User is actually a good thing as it helps maintain any historical information about that user, including completed tasks and prior record ownership. But most of the time if a user is Inactive an Admin doesn’t want to see them in the list of users. That’s why for all of my User list views I filter out inactive users. All you have to do is set the “Active” field to equal “True”. Now, those inactive users never, ever show up on my views–they’re as good as dead to me.

Because I occasionally do need to see inactive users and you probably do as well, I do recommend creating one list view called “Inactive Users” where the “Active” field equals “False”.
List View Visibility
As with all list views, you can opt to have user list views visible only to you, to all users or share with certain groups of users. Most of these list views you’ll want to share only with other Admins.
It Slices and Dices
As you can probably tell, I love list views! I find them much faster than reports for managing my daily admin workload as I can jump from one view to another instantly. I can customize the columns on the fly if need be and quickly drill-down and view and edit the records I need to work on. I also like that I can click on column headers to quickly sort and filter by values. The one big gotcha though is you cannot do inline edit on the user list view. Be sure to vote for this idea as it will be a huge time-saver for editing multiple users at once. Even without this, user list views should be in your user management arsenal.
#SMT
Get Organized with Custom User Fields
Posted: November 17, 2014 Filed under: Salesforce Tips and Tricks, SFDC Admin 101 | Tags: User Management 1 CommentOne of the sessions that I presented at Dreamforce this year was “Don’t Let Managing Users Manage You” where I shared 10 tips to make user management less of a pain.
Because user management is such a time-consuming and high-profile part of most admins jobs I thought I would share my tips here over 10 blog posts where I can go into detail about each one.
Tip #1: Get Organized with Custom User Fields
I like to add custom fields to the user object to help stay organized. Obviously you can tailor these custom fields to your unique needs but here are some ideas of general-purpose custom fields that you may want to use.
- Admin Notes – I create a ‘private’ system admin-only field to track notes such as who requested the user be set up or deactivated, why and when.
- Cost Center – This is useful if you need to create reports to charge back licenses to the correct group.
- Personal Information – Common fields are personal Email and personal phone. Great for users to connect after hours.
- Mobile Device – Here I track what type of mobile device they are using such as iPhone, Android or iPad. This is great for finding testers and sending device specific updates. (I’ll cover more about that on a future blog post)
- Additional App Licenses – If you have add-on apps you may want to track what users have access. This can be redundant information but is very helpful to have every app license in one central place for reporting, terminations, and testing.
- Signature Block – If you use email templates consider adding a signature block to the users record to prepopulate and format address and company taglines.
- Photo Url – To include photos on html email templates just place the url of the photo on the users record. An easy way to get a url is to load the photos to a public Document in Salesforce. Then just include that field in email templates
- Access Deactivation date – Add a custom date field to track when you deactivated the user or when you should deactivate their license. Sometimes you know in advance when to turn off seats (terms or trial users) just put in a date and use workflow rule to auto-deactivate them. (look for more tips on user workflow rules in a future post).
This is just scratching the surface for custom user fields.
To add custom fields just go to Setup>>Customize>>User>>Fields>>New.
As with any custom field, you can choose what profiles can View and Edit these new fields. You can also update your page layout so they are displayed in a logical manner. Unfortunately you can not change the layout for the Standard User fields which display at the top of the User page.
#SMT
Overcoming the Salesforce Tab Limit
Posted: July 30, 2014 Filed under: Salesforce Tips and Tricks, SFDC Admin 101 Leave a commentMost Salesforce orgs have a limit to the number of custom “Tabs” that they can have. Currently, the limit is 5 for Group, 10 for Professional and 25 for Enterprise. Throw in a few custom objects and websites and it is easy to hit the ceiling on Tabs.
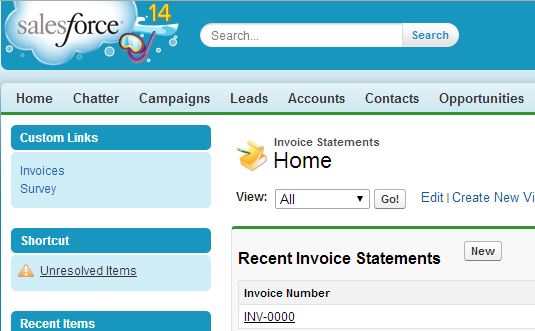
Fortunately there is an easy way to get to an objects Home page without using one of your precious few tabs.
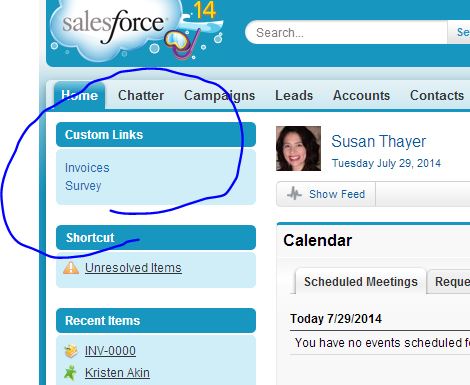
Instead of a tab at the top you can easily add quick links to the left side-bar of your Salesforce screen that takes the user to the desired page.
The first thing to do is to get the secret Entity ID to your custom objects home page. This is easy to do. Just go to ANY record for your custom object. Look at the URL and take note of the first three characters after “Salesforce.com”.
In this example, it is “a03”
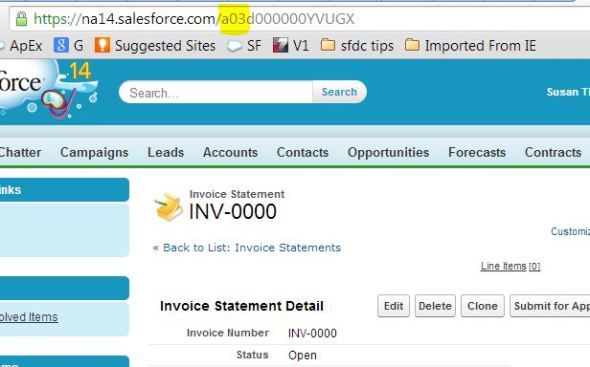
Two items of note, alpha characters are case-sensitive and zero (0) and O are really, really hard to tell apart. To reduce the likelihood of error I like to copy and paste.
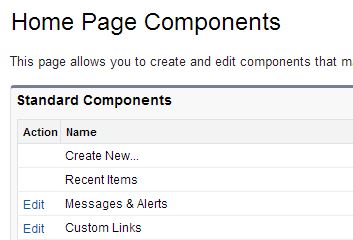
Now that you have your secret code to your custom object it’s time to create a custom link. Go to Setup>>Customize>>Home>>Home Page Components and click {Edit} next to “Custom Links”
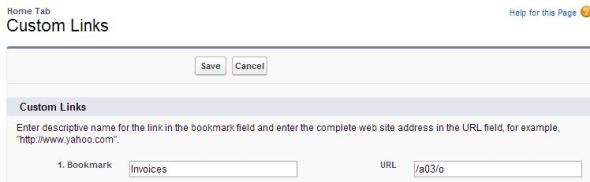
Enter a new Bookmark name to display and then the URL to link to. The URL only needs to contain the 3 digit Entity ID. You should remove the first part of the url that references the specific server (In this example I omitted https://na14.salesforce.com). This will allow your link to work even if you are moved to a new Salesforce server.
I also like to add “/o” to my link so it takes the user to the “Recent Items” view for the object and it displays the object name at the top. It works without the “/0” but that takes the user to their last List View.
So in this example, all I place in the URL to link to field is /a03/o
Now I make sure my “Custom Links” are displaying on the home page layout by going to “Home Page Layout” edits. I check the box next to “Custom Links” to display and indicate the order the narrow components should be in.

If you don’t want every user to see the link or you want different links for different groups there are ways to add Custom “Components” to different page layouts. For this example, we’re keeping it simple with just one group of “Custom Links”.
Viola! Now my links to my custom objects display on the left-side navigation for every page I visit just like a tab would display across the top on every page.
Clicking the link will take me directly to that objects home tab, as shown below, where I can now see my recent items and run any list view.
Note: If you don’t see the home page components on all pages then go to Setup>>Customize>>User Interface>>Settings and check “Show Custom Sidebar Components on All Pages”.

You can do this same thing for links to standard objects, Visualforce pages, and other web pages.
One very popular use for custom links is to link to the Activities tab. For your reference that is Entity ID number “/007”. Many users find it nice to have quick links to “My Open Activities” or “Today’s Activities”. That allows them to jump to activity list views without having to go to the Home Page.
What will you link to?
-SMT
Displaying a Calendar in Salesforce 1
Posted: April 29, 2014 Filed under: Salesforce Tips and Tricks, Salesforce1 | Tags: Calendar, List Views, Salesforce1 5 CommentsSalesforce1 is a great tool for road-warriors; it lets them see key contact and account information anywhere, update opportunities in real-time and add notes, photos and other updates from meetings. There is one big thing missing though–the ability to see a calendar of activities.
Until Salesforce gets this functionality added, I have created a workaround using Visualforce and Activity List Views to create a new Salesforce1 calendar view accessible from the Navigation menu.
Here’s how to add a calendar view to Salesforce1 in 3 easy steps:
Step 1: Start by creating Activity List Views
- Start by going to the following url https://naX.salesforce.com/007 (be sure to replace the X with the number assigned to your org).
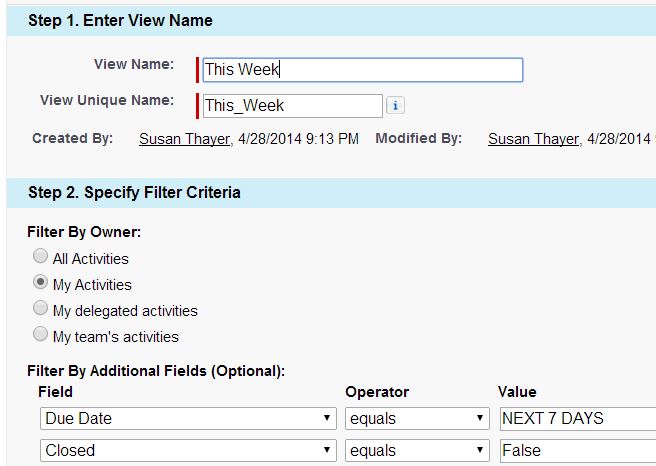
- Then click on “Create New View” and create a list view per normal.
- Filter on “My Activities” that are not closed. Use Due Date to add your time range. <TIP>You can use relative date values, such as “This Week” or “Next 14 Days” in your filters.
- Since this will be loaded on mobile devices, I recommend a max of four columns; due date, subject, (contact) name, and related to.
- After you save the list view make note of the list view ID. This is shown in the url on the screen that appears after you click “save”. You’ll need the list id for step 2.
Note: You can create multiple list views such as “This Week” and “Next Week” or larger time periods like “Next 30 Days”. Views can be combined into one tab or create separate tabs. Be sure to keep download speed in mind when designing list views.
Step 2: Create a Visualforce page to display the activity view
- This is real easy to do! Go to “Setup” and search for “Pages”.
- Once on Pages, click “New”. Give your page a label, name and description.

- Check “available for Salesforce mobile apps”
- Delete the sample code and replace with the following code.

<apex:page >
<apex:enhancedList type=”Activity” height=”600″ listid=”00BM0000000OKQp” customizable=”FALSE” rowsPerPage=”10″/>
</apex:page>
Note: This list view is set for 600 pixels, the majority of phones have a screen resolution of 320 pixels high; adjust accordingly for your users.
Step 3: Create a Visualforce tab and add it to Salesforce1
Now that the page is created you’ll need to create a tab to display the results. Here’s step by step how to do that.http://help-jupiter.sfdro.com/apex/HTViewSolution?id=000188546&language=en_US
Be sure to check “Mobile Ready” and add the tab to your selected list under “Mobile Navigation”.
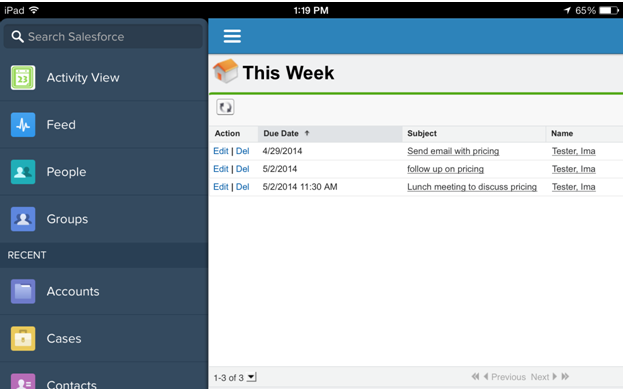
That’s it! Now log into Salesforce1 to test out the new navigation option. In this example, clicking on “Activity View” in the left side navigation will take the user to the list view for “This Week”.
Now your mobile users can see more than just “Today”. They can see any list view that you configure for them. You can even combine list views in one view or create a separate navigation link for different views.
Now if a sales rep is on the road, they can easily glance to see who they are meeting tomorrow and when. If you create a list view for “Next 30 Days” they can even check their calendar in Salesforce1 and schedule follow up appointments with confidence knowing that they are available.
-ST
Dreamforce 13 Highlights
Posted: November 24, 2013 Filed under: Salesforce Tips and Tricks | Tags: Dreamforce, Mobile Leave a commentWhew! Just got back from an action-packed week at Dreamforce where I was able to test-drive many apps, learn new tricks and see the roadmap for Salesforce.com.
Here are the top 5 new items covered at Dreamforce 13.
1. Salesforce 1. Salesforce 1 is the latest mobile app from Salesforce. I’ve been playing with it since it was released and really like it on my Android phone. It’s got Chatter, Cases, Opportunities and a consolidated “Today” calendar with a handy map/phone feature. For my iPad, I’m still partial to the browser solution but with a few enhancements I can see me using the app a lot more.
2. Salesforce A Like many Admins, I lugged my heavy laptop with me over 1500 miles to Dreamforce–just in case there was an emergency admin issue that my iPad could not handle. Next year it stays at home thanks to Salesforce A. SalesforceA is the new mobile app for Admins Only that makes it easy to see Users records to freeze users and reset passwords. It even has the release notes and quick access to the success community.
3. ExactTarget Marketing Cloud Okay, so those familiar with ExactTarget and Pardot really didn’t see anything too new but what was so exciting for marketing geeks like myself was the passion and emphasis that was placed on the Marketing Cloud at Dreamforce. The future of sales and marketing is digital and social. Seeing the case studies of the possibilities was amazing.
4. Mobile The mobile emphasis started with Salesforce 1 and Salesforce A but continued well beyond that. Salesforce was also busy this year developing an improved Dreamforce app that kept your session schedule, notes and chatter feed at the palm of your hand.
The mobile hackathon featured a one million dollar prize–the largest ever for a hackaton. Some great new mobile apps were developed that hopefully will be on the market soon.
Plus many of the vendors in the Cloud Expo demoed mobile solutions. Even the session check-ins featured magic scanners that they just waved in front of your badge.
5. Women Last but not least, Dreamforce was focused on the FemmeForce to encourage more women in IT and leadership roles. Need evidence of the lack of women? Just look at how the line for the men’s room is twice as long as the women’s. Keynote speakers featured Marrisa Mayer from Yahoo! and Sheryl Sandberg from Facebook. I for one was very moved by Sandberg’s talk about her book Lean In and encourage everyone to read it. It is very eye-opening.
DF13 may have just ended but now the real work begins to test and implement all the new ideas and apps that I discovered. What fun!
ST
IE, Chrome and Firefox for Salesforce
Posted: June 7, 2013 Filed under: Salesforce Tips and Tricks | Tags: admin, browser, chrome, favicon, sandbox 1 CommentSometimes I wonder if the M in my middle name stands for “Multi-tasking” as I find myself oftentimes doing a million things at once. As evidence, just take a look at my computer while I’m working and you’ll find not one but three browser open every time.
Over the years I have found three browsers helps me stay organized.
- I use Internet Explorer for tabs for my Salesforce Production org.
- I use Chrome for tabs for my Sandbox org.
- I use Firefox for tabs for miscellaneous tasks and orgs.
That third browser let’s me log in as another user for testing purposes while simultaneously logged in as myself in either Chrome or IE to make real-time changes based on the testing results.
Without having to think or scroll up to see the black Sandbox identifier found in the top right, I can easily avoid confusing production and sandbox by knowing if I am in Chrome I am in the sandbox.
And for an added level of confirmation I also downloaded a handy app that puts an “S” favicon on sandbox tabs. Here’s a screenshot of the Sandbox tab, with the “S” favicon next to my standard Production org tab.
Sandbox tab with a favicon next to production tab
Click here to get it yourself.
Finally, if you don’t have two monitors you MUST request another one immediately-having two screens to compare side-by-side will make you extremely more efficient. I use my right monitor for Sandbox and my left for Production.
Bottom line, pick a consistent strategy for managing your Salesforce instances and it will make your job easier.
>>SMT
Reporting Accurate Record Counts
Posted: October 22, 2012 Filed under: Salesforce Tips and Tricks Leave a commentIf you’ve created a report in Salesforce you’ve no doubt noticed that sometimes the record count that is shown doesn’t quite jibe with the one you were expecting.
In this example, let’s say you wanted to know how many Accounts there were on the report, the Grand Total shows 7 Records. But wait, if you look closely there are only 3 accounts and 7 contacts. So how can you report on the TRUE count of Accounts?
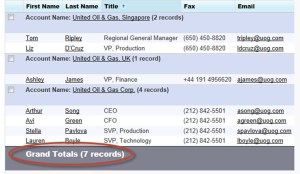
For a small report like this you could hide the contacts and count the Accounts by hand or you could export it to Excel but I have a better solution.
Simply add a custom formula field to each object with the value of 1 and sum that field. I know, I know, it sounds crazy. I personally scoffed at this idea the first time I heard about it at Dreamforce a few years ago. But trust me, it works. Add the formula and voila! you get this instead on your reports…

Look how nicely it counted the Accounts for me. She’s a thing of beauty.
Here is what the formula looks like. The value of the formula is “1”–yes, literally the number 1 in the formula field. Salesforce gurus call this “The Power of One“.
Pro tip: When creating the formula there’s no need to add it to a page layout since it is for reports only.

The Salesforce Power of One Formula is Super Easy to Create
If you’re like me you’re probably still a bit skeptical but give it a go anyway, I know that once you try it you’ll be using it all the time and adding it to additional objects. Trust me, you’ll love it.
>>ST
